Keras 따라하기 모델저장과 복원
Keras 를 사용하여 모델저장과 복원하는 방법을 배워본다.
모델의 신속성을 위해 샘플은 처음 1,000개만 사용한다.
|
1 2 3 4 5 6 7 8 9 10 11 12 |
from __future__ import absolute_import, division, print_function, unicode_literals import os import tensorflow as tf from tensorflow import keras (train_images, train_labels),(test_images, test_labels) = tf.keras.datasets.mnist.load_data() train_labels = train_labels[:1000] test_labels = test_labels[:1000] train_images = train_images[:1000].reshape(-1,28 * 28) / 255. test_images = test_images[:1000].reshape(-1, 28 * 28) / 255. |
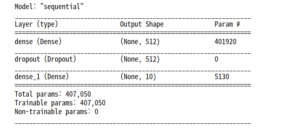
가중치를 저장하고 불러오는 예제를 위해 모델을 정의한다.
|
1 2 3 4 5 6 7 8 9 10 11 12 13 14 |
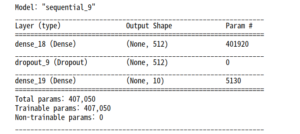
def create_model(): model = tf.keras.models.Sequential([ keras.layers.Dense(512, activation=tf.keras.activations.relu, input_shape=(784,)), keras.layers.Dropout(0.2), keras.layers.Dense(10, activation=tf.keras.activations.softmax) ]) model.compile(optimizer=tf.keras.optimizers.Adam(), loss=tf.keras.losses.sparse_categorical_crossentropy, metrics=['accuracy']) return model model = create_model() model.summary() |
훈련하는 동안 체크포인트 저장하기
tf.keras.callbacks.ModelCheckpoint 는 체크포인트를 자동으로 저장해주는 콜백(callback)이다. 체크포인트 콜백 사용하기
|
1 2 3 4 5 6 7 8 9 10 11 |
checkpoint_path = "/home/gjtrj45/jupyter_workspace/training_1/cp.ckpt" chechpoint_dir = os.path.dirname(checkpoint_path) cp_callback = tf.keras.callbacks.ModelCheckpoint(checkpoint_path, save_weights_only=True, verbose=1) #verbose = 과정을 자세히보여주다 model = create_model() model.fit(train_images, train_labels, epochs=10, validation_data = (test_images, test_labels), callbacks = [cp_callback]) |

위 코드는 텐서플로 체크포인트 파일을 만들고 에포크가 종료될 때마다 업데이트한다.
|
1 |
!ls {checkpoint_dir} |

위와 같이 업데이트된 가중치가 저장되어 있는 것을 볼 수 있다. 이제 훈련하지 않은 새로운 모델을 만들어 그냥 예측해보는 것과 훈련된 가중치를 불러와 예측해보는 것 둘을 비교해본다. 가중치만 복원할 땐 원본 모델과 동일한 구조로 모델을 만들어야 한다.
|
1 2 3 4 |
model = create_model() loss, acc = model.evaluate(test_images, test_labels) print("훈련되지 않은 모델의 정확도: {:5.2f}%".format(100*acc)) |
![]()
|
1 2 3 |
model.load_weights(checkpoint_path) loss, acc = model.evaluate(test_images, test_labels) print("복원된 모델의 정확도: {:5.2f}%".format(100*acc)) |
![]()
이 콜백 함수에는 몇 가지 매개변수를 제공하며 체크포인트 이름을 고유하게 만들거나, 체크포인트 주기를 지정할 수 있다. 새로운 모델을 훈련하고 다섯 번의 에포크마다 고유한 이름으로 체크포인트를 저장해 본다.
|
1 2 3 4 5 6 7 8 9 10 11 12 13 14 15 |
# 파일 이름에 에포크 번호를 포함시킵니다. checkpoint_path = "/home/gjtrj45/jupyter_workspace/training_2/cp-{epoch:04d}.ckpt" checkpoint_dir = os.path.dirname(checkpoint_path) cp_callback = tf.keras.callbacks.ModelCheckpoint( checkpoint_path, verbose=1, save_weigths_only=True, #다섯 번째 에포크마다 가중치를 저장 period = 5) model = create_model() model.save_weights(checkpoint_path.format(epoch=0)) model.fit(train_images, train_labels, epochs=50, callbacks = [cp_callback], validation_data = (test_images, test_labels), verbose=0) |
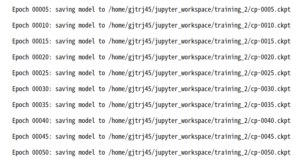
만들어진 dir을 확인하면 에포크 주기마다 그 에폭 숫자로 이름이 저장되어 있는 것을 볼 수 있다.
|
1 |
!ls {checkpoint_dir} |

마지막으로 만들어진 checkpoint를 확인해본다.
|
1 2 |
latest = tf.train.latest_checkpoint(checkpoint_dir) latest |
![]()
..? cp-0050이 떠야하는데 난 왜 이게뜨지? 결국 저장된 cp-0000 은 업데이트 가장초기라 쓰레기 가중치를 갖고 있음.
|
1 2 3 4 |
model = create_model() model.load_weights(latest) loss, acc = model.evaluate(test_images, test_labels) print("복원된 모델의 정확도: {:5.2f}%".format(100*acc)) |
![]()
그냥 수동으로 50에포크 파일을 불러와 실행한다.
|
1 2 3 4 5 6 7 8 |
#latest = tf.train.latest_checkpoint(checkpoint_dir) latest = "/home/gjtrj45/jupyter_workspace/training_2/cp-0050.ckpt" latest model = create_model() model.load_weights(latest) loss, acc = model.evaluate(test_images, test_labels) print("복원된 모델의 정확도: {:5.2f}%".format(100*acc)) |
![]()
|
1 2 3 4 5 6 7 8 |
model.save_weights("/home/gjtrj45/jupyter_workspace/checkpoints/my_checkpoint") #가중치를 복원 model = create_model() model.load_weights("/home/gjtrj45/jupyter_workspace/checkpoints/my_checkpoint") loss, acc = model.evaluate(test_images, test_labels) print("복원된 모델의 정확도: {:5.2f}%".format(100*acc)) |
![]()
note : 텐서플로는 기본적으로 최근 5개의 체크포인트만 저장한다.
체크포인트파일
위 코드는 가중치를 일련의 체크포인트 포맷의 파일에 저장한다. 이 파일에 포함되는 것은 훈련된 이진 포맷의 가중치다. 체크포인트가 담고있는 것은 다음과 같다.
- 모델의 가중치를 포함하는 하나 이상의 shard
- 가중치가 어느 shard에 저장되어 있는지를 나타내는 인덱스 파일
단일 머신에서 모델을 훈련한다면 .data-00000-of-00001 확장자를 가진 shard 하나만 만들어 진다.
이제 모델 전체를 저장하기를 알아본다.
전체모델을 파일 하나에 저장할 수 있다. 여기에는 가중치, 모델 구성, 심지어 옵티마이저에 지정한 설정까지 포함된다. 모델의 체크포인트를 저장하므로 원본 코드를 저장하지 않고 나중에 정확히 동일한 상태에서 훈련을 다시 시작할 수 있다. 이 기능의 사용은 TensorFlow.js 로 모델을 로드한 뒤 웹 브라우저에서 모델을 훈련하고 실행할 수 있다. 또는 모바일 장치에 맞도록 변환한 다음 TensorFlow Lite를 사용하여 실행할 수 있다. (HDF5, Saved Model)
HDF5 파일로 저장하기
케라스는 HDF5 표준을 따르는 기본 저장 포맷을 제공한다. 저장된 모델을 하나의 이진 파일처럼 다룰 수 있다.
|
1 2 3 4 5 6 |
model = create_model() model.fit(train_images, train_labels, epochs=5) #전체 모델을 HDF5 파일로 저장한다. model.save("/home/gjtrj45/jupyter_workspace/my_model.h5") |

이제 이 파일로 부터 모델을 다시 만든다.
|
1 2 3 |
#가중치와 옵티마이저를 포함하여 정확히 동일한 모델을 다시 생성한다. new_model = keras.models.load_model("/home/gjtrj45/jupyter_workspace/my_model.h5") new_model.summary() |
정확도를 확인한다.
|
1 2 |
loss, acc = new_model.evaluate(test_images, test_labels) print("복원된 모델의 정확도 : {:5.2f}%".format(100*acc)) |
![]()
이 기법은 모든 것을 저장하다 ( 가중치 값, 모델 설정(구조), 옵티마이저 설정 )
현재는 텐서플로 옵티마이저 (tf.train)를 저장할 수 없다. 이런 경우에는 모델을 로드한 후에 다시 컴파일해야 한다. 옵티마이저의 상태는 유지되지 않는다.
saved_model 사용하기
은 향후에 지원되지 않으므로 skip
References : Tensorflow 시작하기 – 모델 저장 및 복원